In the toolbox of any pen tester, there is an app that allows them to detect open ports on a given server. Thanks to such an app, they can list all network entry points available on the system. These entry points can be open doors for attackers and this is why they need to identify them early in the process.
The most famous TCP port scanner is a tool called nmap. You might have already used it. This is a complex piece of software. In this article, we will build a simpler version in Go.
The TCP protocol in theory
First, let’s review the basics of the TCP protocol. If you feel comfortable with it, feel free to skip this section and go directly to the hands-on part 😸
First, TCP stands for Transmission Control Protocol. Sometimes, we refer to it as the TCP/IP protocol because it is a complement to the Internet Protocol (IP). The combination of the two provides a way for two applications to communicate together. These applications may run on two different hosts but they must be on the same IP network.
Nowadays, the TCP protocol is everywhere as the Web is built on top of this transport layer.
The TCP protocol in practice
In order to write our port scanner, we need a little bit more knowledge about how this protocol is implemented. For our use case, we are only interested in the connection process, what we call the handshake process. Thanks to this process we will determine if the port is open, closed, or filtered.
First, let’s what happens if the port is open with a little schema.

This is a three-way handshake.
- The client sends an SYN (synchronized) packet which contains a sequence number A. This sequence number is randomly generated and its purpose is to identify each byte of data. Thus, we can keep track of the order in which the packets are exchanged and re-order them in case of failures.
- The server sends an SYN-ACK packet. ACK stands for acknowledgment. Along with this packet, it sends back the sequence number incremented by one, so A + 1 and a new random number B.
- The client finishes with an ACK, acknowledgment of the server’s response that contains A + 1 and B + 1 numbers.
Full-duplex communication is set up.
What if the port is not open? Then, there are two scenarios. Either the port is closed or there is a firewall rule that prevents the client from reaching its target. The port is filtered.
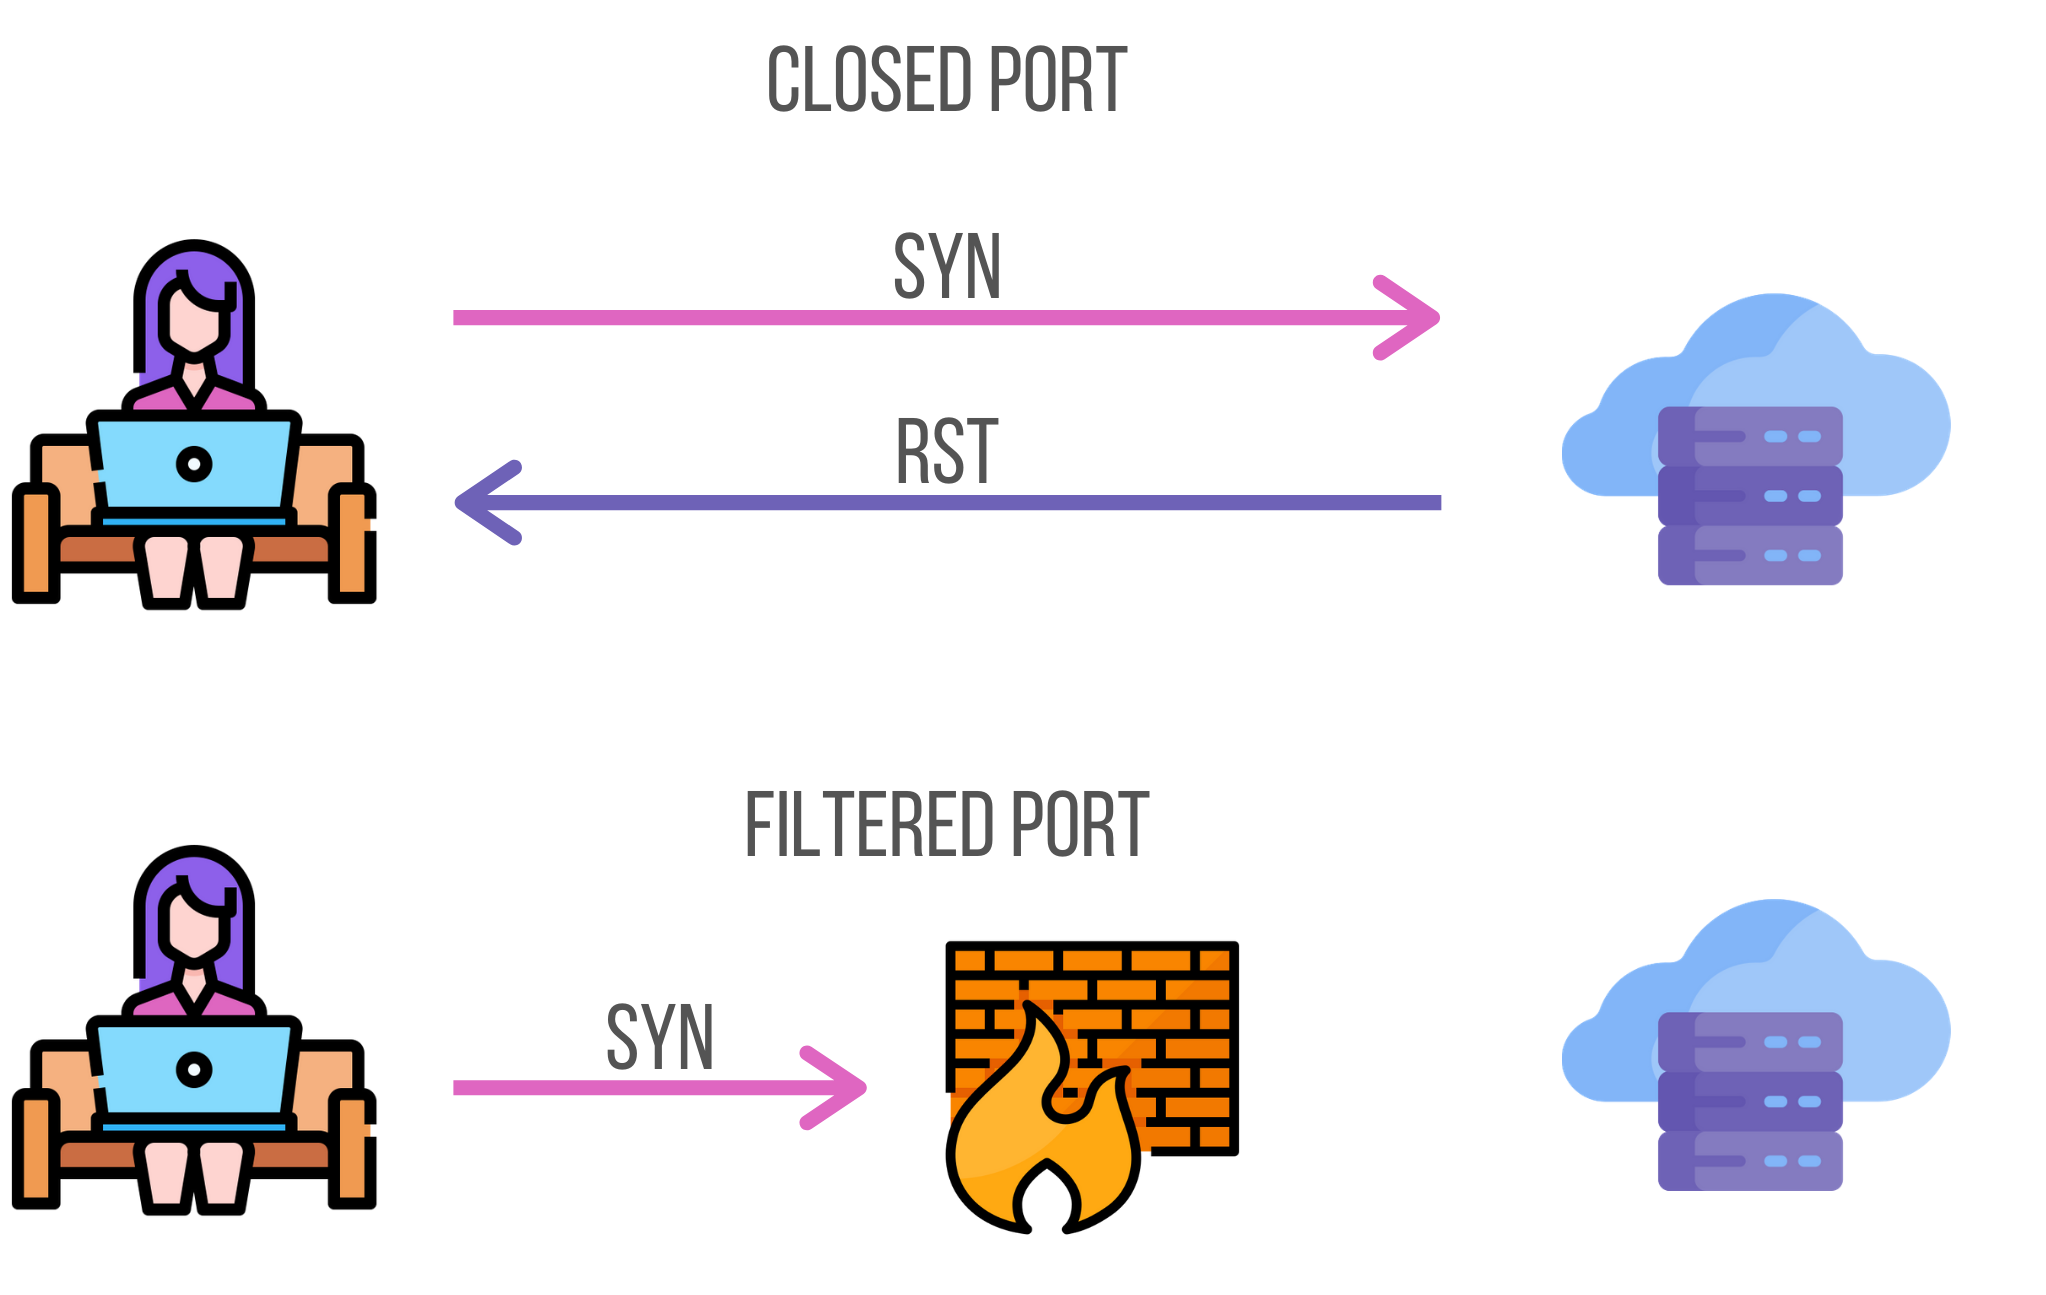
So, when the port is closed, the process normally starts but the server replies with an RST (reset) packet, which means that the port is closed.
But, if you do not receive a response from the server and you observe a timeout, this means that access to this port is blocked because of firewall rules. Firewall rules are a way to select who can access which resource. These rules affect inbound traffic as well as outbound traffic.
Let’s see these concepts in action. We’ll use a tool called tcpdump. This is a simple CLI app that allows you to monitor your network traffic. You may also consider using Wireshark and that’s fine, it also does the job well.
Network traffic monitoring with tcpdump
Note: The following examples have been tested on macOS and might not work on other OS. However, it is essentially the same for other operating systems.
First, you need to know your network interfaces. On macOS, open a terminal session and type:
networksetup -listallhardwareports
Select the interface that is between your computer and the Internet. As far as I’m concerned, it is en0. Feel free to replace it in the following examples.
Then, for a quick test, launch the following command:
sudo tcpdump -i en0 tcp
If you chose the correct interface, you should be able to see all packets that go through this interface. Fascinating, isn’t it?
You can have fun getting through all these packets and explore some of the options available. You should see keywords like ack, seq, and so on. This is a good exercise to get familiar with the concepts we introduced above.
Time to Go!
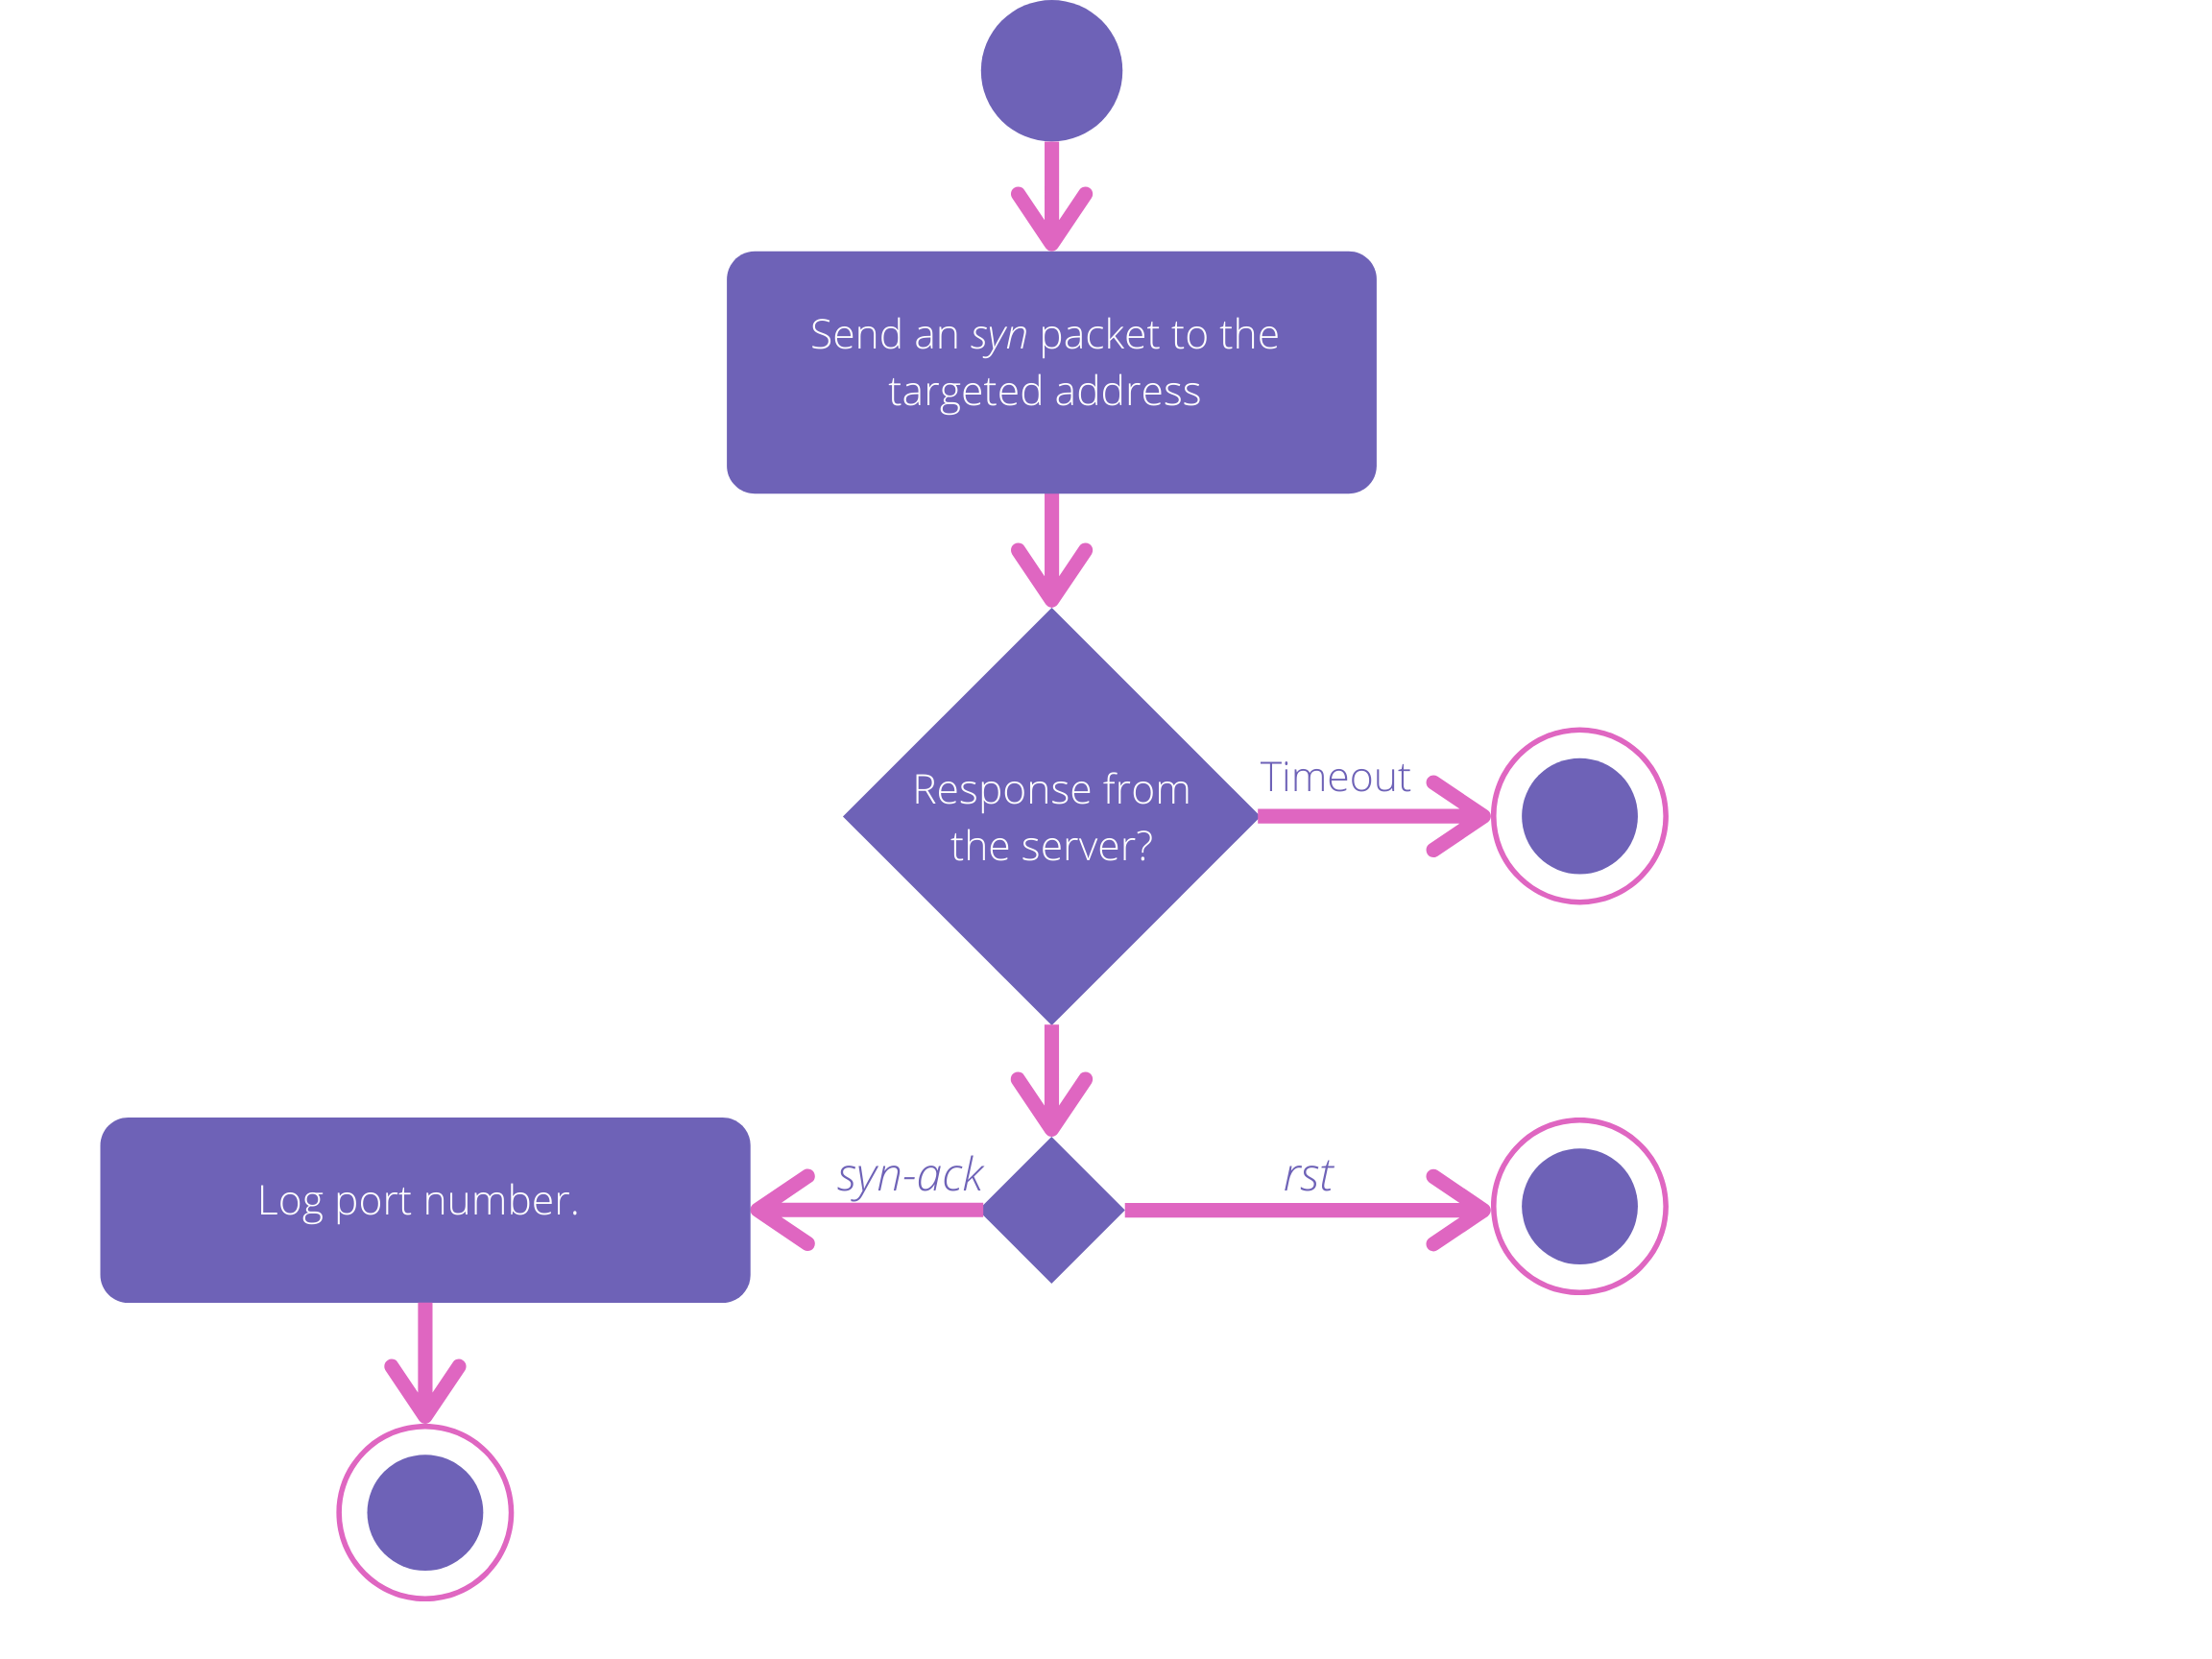
Now we are familiar with the TCP protocol, it is time to start coding! First, let’s take a step back and think about how we can programmatically determine if a port is open.
Based on your knowledge of the TCP protocol, you may think of sending a request and wait for the server’s response. It is indeed the way to go! If there is no response, then it is because of firewall rules. Otherwise, we will have to examine the response and identify the nature of the segment (syn-ack or rst?).
In Go, there is a package in the standard library that already does this job for us. It is the net package.
For the sake of this tutorial, we will use a playground provided by the Nmap Security Scanner Project and Insecure.org. Here is the first version of our program.
Run it! You should see two open ports. Have you noticed how long it took to scan every port? 😲 This is due to the fact that our program scans one port after the other. We can do better by executing these tasks concurrently. Notice that I used the word “concurrent” instead of “parallel” as they have different meanings, especially in Go. See this talk by Rob Pike, one of the creators of Go, for more details.
Fortunately, concurrency is one of the strengths of the Go programming language … Indeed, Go has been designed with concurrency in mind and the creators made it easy to implement.
We can particularly leverage Goroutines and Channels.
Goroutines are often described as lightweight threads. They allow you to execute functions concurrently. The good news is that you have already used them without knowing it! Indeed, every Go program has at least one Goroutine: the main goroutine. So, when we ran our first version of our TCP scanner, one Goroutine has been automatically created when the process began.
We could encapsulate all the code in the for loop in a goroutine. But we may encounter inconsistencies in the results because once the execution of the for loop over and all the goroutines initialized, the program will exit while packets are still on their way.
This is where channels can be helpful. Channels are used to facilitate communication between goroutines. They can be seen as streams of information. Indeed, values may be passed along the channel or read from it.
As I was looking for documentation, I found the solution from the book Black Hat Go to be quite elegant.
That’s it! 🎉 We now have a highly efficient port scanner!
This solution may be a little difficult to understand if you are not familiar with concurrency principles. But it’s ok! Concurrency is hard for many reasons. As humans, we tend to think sequentially and this is why most of the time developers struggle with concurrency. At the bottom of this article, you will find some references that will help you better understand this new way of thinking.
Conclusion
To summarize, we first discovered the TCP protocol internals. We used this knowledge to build a naive TCP port scanner and then iterated on this first version leveraging Go concurrency features. Finally, we got an efficient tool but there still is room for improvement. For example, we could add a CLI layer to interact with our program directly from our terminal. It would also be interesting to profile our program to detect performance bottlenecks (is 100 workers the best choice?). I leave that for another blog post 😊
I hope you enjoyed reading this tutorial as much as I enjoyed writing it.
Resources and credits
- Cover Photo by Thomas Jensen on Unsplash
- Icons by Freepik and Linector
- Wikipedia, Transmission Control Protocol
- Katherine Cox-Buday (2017), Concurrency in Go, O’reilly Media, Inc
- Tom Steele, Chris Patten, and Dan Kottmann (2020), Black Hat Go, No starch press